Why would anybody be embroidering on toilet paper? Though it may seem odd, embroidered toilet paper can make a great item for a gift basket, or a guest bathroom. Embroidery on toilet paper can also be used as a holiday decoration, a fun gag gift, or as a promotional item. Following these few simple steps, you can easily embroider your own roll of toilet paper and be sure to watch our instructional video below.
Gather your Supplies
Choose the thickest toilet paper you can buy, it will make embroidery easier and will hold the stitches better. Go with at least a 2-ply or thicker.
Embroidery Design: Stay away from dense fills, vintage style stitches or sparse fills are best for stitching on toilet paper. Very dense designs may tear the toilet paper.
4" x 4" hoop - using the smallest hoop possible will provide the most stabilization.
Roll out your toilet paper and take about 3 squares and fold it over. Roll out some more and take another 3 squares and fold it over again so you have 4 layers of toilet paper.
Hoop both your toilet paper and embroidery backing. For some extra stabilization, you can use a light misting of one of these adhesive sprays.
Attach your hoop to your machine and slow down your machine speed before starting. Load your design, and you are ready to embroider.
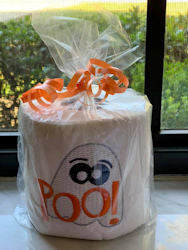
When finished, trim off your cut away backing, re-roll your toilet paper and you are finished! For a nice finishing touch, you can put your completed embroidered toilet paper in a bag and seal with some ribbon.
First of all , your instructions are the best I’ve seen. Anywhere. And can I ask where you got your bags and what size are they? Thank you
Rosie Gonzalez - December 27, 2022
Loved your tutorial.
What size party bag do you purchase?
Thank you Nicole
Janet Landry - May 20, 2020
I was never brave enough to try this but after watching your video I know I can do it. Video was great and very very helpful
Angela Matthews - May 19, 2020
I have always wondered what IN THE HOOP MEANS…could you do something from beginning to end that is an in the hoop project please.
Anonymous - May 19, 2020
I did 2 rolls a few years ago. One with an iris design and another with a deer in the woods by a stream. This one even had metalic thread in it. It was for a “man Cave” and everyone loved it.
Laura - May 16, 2020
What size bags do you use?
Carol - May 16, 2020
GREAT idea!! What size plastic bag is used?
Pam - May 15, 2020
Very cute! This is something I would never have thought to do. With TP in such short supply, I hope someone doesn’t tear the bag open and use the embroidered pieces!

Comments
Leave a comment